Common Lisp development with Vim
Published: December 07, 2010You have used Vim for so long, and you have it so ingrained within you, that when somebody suggests you use other editor you instinctively reply “over my dead body!”. I know how you feel.
And then one day you start programming in Common Lisp; everybody says that you must use Emacs with SLIME; and after not so long you actually start considering switching to it!
The horrors!
I believe that for some long-time Vim users, switching to Emacs is not an easy option. Personally I’m afraid of immersing into Emacs, spending countless hours learning its ways and idiosyncrasies, without gaining any significant advantage over Vim. Those countless hours could be better spend immersing yourself into learning Common Lisp (or something else).
In this article I’ll show you how I’m using Vim to develop applications with Common Lisp.
There are a few plug-ins for Vim to do Common Lisp development, two of them are Limp and slimv. Of those two I liked Limp better, although it does some things in ways that I don’t agree with, therefore I modified it a little to meet my needs. Keep in mind that those are my personal preferences, and I don’t claim them to be the correct way of doing things.
But before continuing, I’d like to express my gratitude and admiration to Limp’s author, Mikael Jansson, for all the hard work put into it.
Now I’m going to show you the modifications I did to Limp, but first you need to download and install it; it shouldn’t be too difficult, follow the documentation.
1. Disable highlighting.
Limp does automatic highlighting of contents inside any pair or parenthesis, but I think there’s two problems with it. First, I find it distracting, I don’t like the constant changing of colors all over the place while moving the cursor through the code. Second, it slows down the rendering of the text significantly, and the whole thing feels unresponsive.
I don’t see the benefit of this highlighting. I think that keeping a sane indentation of your code is enough to see the nested structures in it. I also think that if you don’t keep a logical indentation of the code at all times, you are doing something wrong.
We will also see how to make Vim indent Lisp code correctly further below.
Inside the main Limp folder there is a vim subfolder; open the file
limp.vim and at the end you can see several runtime commands; comment
out the one that loads the highlight.vim file.
"runtime ftplugin/lisp/limp/highlight.vim
Then open the file mode.vim and around line number 58 you can see the
call to initialize the highlighting mode; you need to comment it out too.
"call LimpHighlight_start()
And the call to stop the mode, located around line number 68, comment it out too (if you are using an SVN version of the code, it may already be commented).
"call LimpHighlight_stop()
2. Disable Autoclosing of parenthesis.
Another feature of Limp is an automatic insertion of closing parenthesis when you type the opening parenthesis. There’s a big problem with this feature in that it is buggy and leaves visual debris on the screen when undoing operations (at least with gvim).
Even if it were not buggy, I think that far from helping it will only distract you unnecessarily. You will have a huge number of closing parenthesis after your cursor while in the middle of trying to figure out the shape of your code. And you still need to type the closing parenthesis on your keyboard to continue writing the next form.
I believe that you only need the highlighting of matching pairs, automatic indentation, and a shortcut to automatically close any remaining open parenthesis once you are satisfied with your block of code
We’ll see how to add such a shortcut further below.
If you want something to manage parenthesis that is similar to Emacs’ ParEdit you could probably find a plugin that does that (I didn’t look up).
Like in the previous step, comment the instruction to load this feature
inside the file limp.vim:
"runtime ftplugin/lisp/limp/autoclose.vim
And inside mode.vim comment the function call to initialize the mode:
"call AutoClose_start()
And of course the call to stop the mode needs to be commented out too:
"call AutoClose_stop()
3. Restore your own color scheme.
I don’t like the colors that Limp sets up, and I don’t see why it should
change them in the first place. If you want to continue using your own
colorscheme, open the file mode.vim and around line number 30 comment
these lines:
"set t_Co=256
"if !exists("g:colors_name")
    "colorscheme desert256
"endif
You can see that there’s a bunch of highlight group definitions there. These are definitions for when using Vim in a terminal, and since I mostly only use gvim I didn’t have to do anything with them. But if you do use Vim inside a terminal you may want to adjust these colors to match your colorscheme, or simply comment them out and use the defaults.
4. Better options
I didn’t like the set of options that Limp sets, especially the old Vi
Lisp indentation mode. I also dislike folding so I disabled that too. My
current set of options look like this (file mode.vim around line 82):
syntax on
setlocal nocompatible nocursorline
setlocal lisp syntax=lisp
setlocal ls=2 bs=2 et sw=2 sts=2 ts=8 tw=80
setlocal statusline=%<%f\ \(%{LimpBridge_connection_status()}\)\ %h%m%r%=%-14.(%l,%c%V%)\ %P
"setlocal iskeyword=&,*,+,45,/,48-57,:,<,=,>,@,A-Z,a-z,_
"setlocal cpoptions=-mp
"setlocal foldmethod=marker foldmarker=(,) foldminlines=1
setlocal foldcolumn=0

set lispwords+=defgeneric,block,catch,with-gensyms

"-----------
"Taken from the bundled lisp.vim file in VIM
"(/usr/share/vim/vim72/ftplugin/lisp.vim)
setl comments=:;
setl define=^\\s*(def\\k*
setl formatoptions-=t
setl iskeyword+=+,-,\*,/,%,<,=,>,:,$,?,!,@-@,94
setl comments^=:;;;,:;;,sr:#\|,mb:\|,ex:\|#
setl formatoptions+=croql
"-----------

" This allows gf and :find to work. Fix path to your needs
setlocal suffixesadd=.lisp,.cl path+=/home/gajon/Lisp/\*\*
Notice I set tw=80 (you may want to disable it); modified the
statusline to be less verbose; disabled folding; disabled the
cpoptions line because I want Vim’s default; copied the options that
come bundled with Vim (they are a lot better); added some symbols to
lispwords; and added a missing dot to suffixesadd (cl extension was
missing a dot).
It is common to find files edited by Emacs (and other editors) that uses a
mixture of spaces and tabs to indent code, and usually they use tabs for 8
spaces and hard spaces for the rest of the indenting if it is not a
multiple of 8. That’s the reason why I set ts=8, so that you can see
those files with appropriate indentation.
5. Disabling the transposing of sexps.
Limp binds they keys { and } to functions that transpose the current
sexp with the previous and next sexp. But they don’t work reliably and I
think they are unnecessary when you can just as easily use dab and p
at the proper place. Besides, the default Vim {} bindings are quite
useful to jump to other top-level forms.
In file keys.vim comment these lines:
"nmap <buffer> {                    <Plug>SexpMoveBack
"nmap <buffer> }                    <Plug>SexpMoveForward
6. Bug when connecting to a running REPL
There’s a bug that prevents Limp from reconnecting to an already running
REPL. In file bridge.vim inside the vim subfolder, around line number
13:
let cmd = s:Limp_location . "/bin/lisp.sh ".core_opt." -s ".styfile." -b ".name
A space was missing between ".core_opt." and -s.
If you obtained an SVN version of Limp, this have been fixed already.
7. Let’s add some improvements, a better REPL
The preceding changes were adjustments that I believe work best for me. You may want to follow them or do other modifications, it’s basically all a personal preference. In the rest of this article I’ll show you a few small additions that I made to Limp.
When you press <F12> Limp will launch an xterm and start SBCL inside it;
this is done from the lisp.sh file in the bin folder.
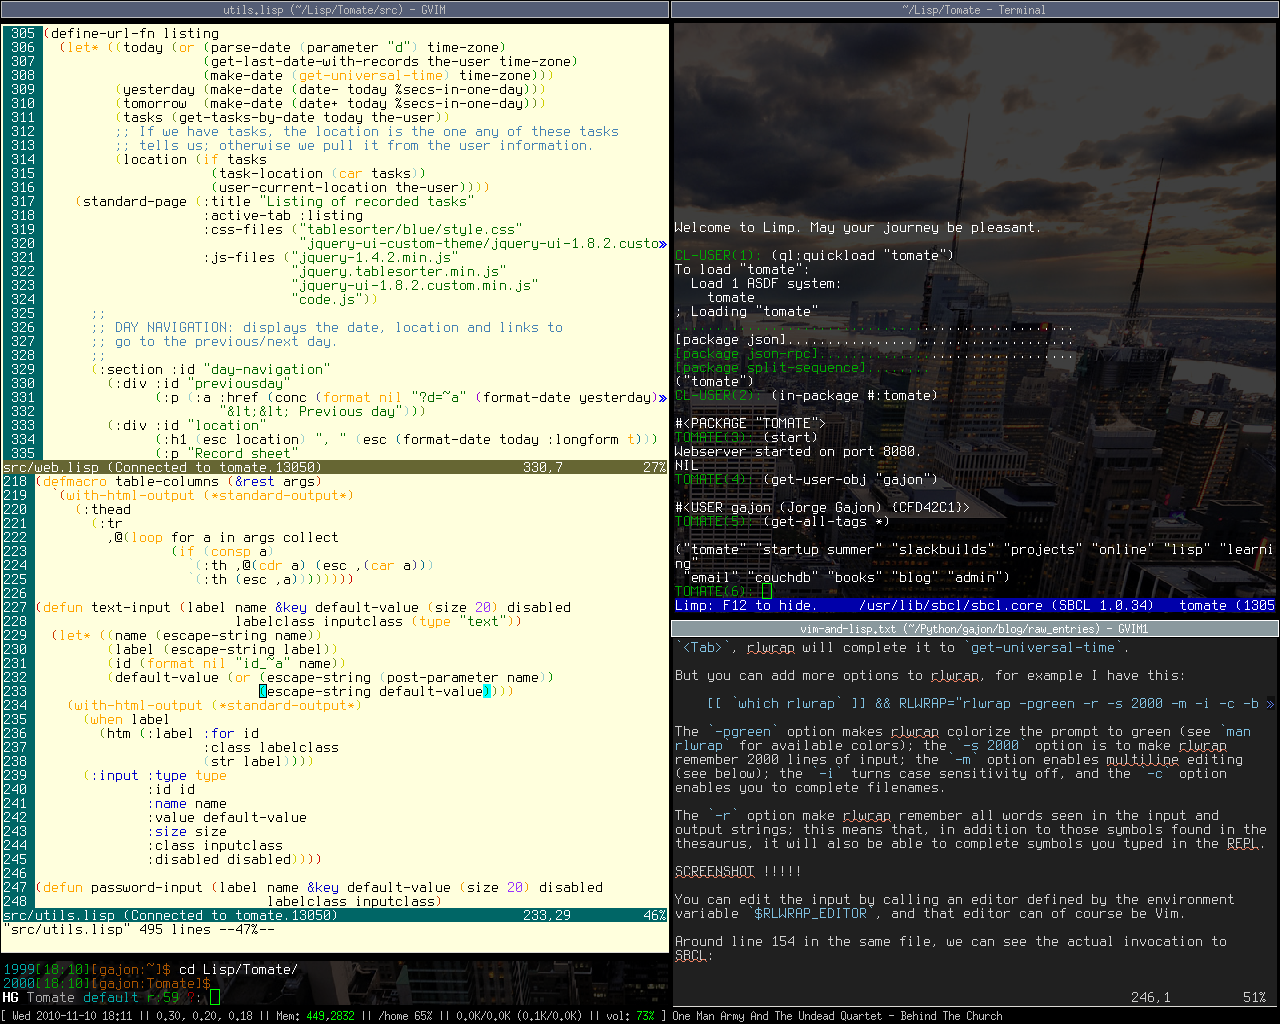
Let’s make the SBCL REPL able to complete symbols from the thesaurus that Limp generated when you installed it (see Limp’s install docs). This is done by telling rlwrap where to look for a list of words to consider for auto completion.
Around line 149 in file lisp.sh we can see the line that defines the
parameters to rlwrap.
[[ `which rlwrap` ]] && RLWRAP="rlwrap -b $BREAK_CHARS"
We can modify that line like this:
[[ `which rlwrap` ]] && RLWRAP="rlwrap -b $BREAK_CHARS -f $LIMPDIR/vim/thesaurus"
Now when Limp starts an SBCL REPL, you can start typing a symbol and hit
<Tab> to complete it; for example if you start typing get-u and press
<Tab>, rlwrap will complete it to get-universal-time.
But you can add more options to rlwrap, for example I have this:
[[ `which rlwrap` ]] && RLWRAP="rlwrap -pgreen -r -s 2000 -m -i -c -b $BREAK_CHARS -f $LIMPDIR/vim/thesaurus"
The -pgreen option makes rlwrap colorize the prompt to green (see man
rlwrap for available colors); the -s 2000 option is to make rlwrap
remember 2000 lines of input; the -m option enables multiline editing
(see below); the -i turns case sensitivity off, and the -c option
enables you to complete filenames.
The -r option makes rlwrap remember all words seen in the input and
output streams; this means that, in addition to those symbols found in the
thesaurus, it will also be able to complete symbols you typed in the REPL.
You can edit the input by calling an external editor defined by the
environment variable $RLWRAP_EDITOR, and that editor can of course be
Vim; this allows us to do multi-line editing.
Around line 154 in the same file, we can see the actual invocation to SBCL:
$RLWRAP $SBCL --noinform $core
We can modify that line to introduce the $RLWRAP_EDITOR environment
variable:
RLWRAP_EDITOR="vim -c \"set ft=lisp\" +%L" $RLWRAP $SBCL --noinform $core
To invoke the editor you can hit CTRL-^, which the man page of rlwrap
says is the default binding but that didn’t work for me and I had to
explicitly add it to my ~/.inputrc file.
My ~/.inputrc (see man rlwrap and man readline):
$include /etc/inputrc
set editing-mode vi
tab: complete
set completion-ignore-case on
set blink-matching-paren on
"\C-^":rlwrap_call_editor

$if sbcl
    set comment-begin ;
$endif
I would also suggest that you load the sb-aclrepl module, which will
give you a better REPL prompt and an inspector. To enable it edit your
~/.sbclrc file and add this form:
(require :sb-aclrepl)
You can find more info here
http://www.sbcl.org/manual/#sb_002daclrepl. After you have
loaded it you can type :help at the prompt to see a list of available
commands. You an also skim the following web page to understand some of
the commands simulated by sb-aclrepl
http://www.franz.com/support/documentation/6.2/doc/top-level.htm
8. Additional mappings
Now let’s add a few useful mappings, you shouldn’t have any problem figuring out how to use these mappings:
In the file bridge.vim add the following lines after line number 265:
nnoremap <silent> <buffer> <Plug>EvalUndefine   :call LimpBridge_send_to_lisp("(fmakunbound '".expand("<cword>").")")<CR>
nnoremap <silent> <buffer> <Plug>EvalAddWord    :let &lispwords.=',' . expand("<cword>")<cr>

nnoremap <silent> <buffer> <Plug>DebugTrace         :call LimpBridge_send_to_lisp("(trace ".expand("<cword>").")")<CR>
nnoremap <silent> <buffer> <Plug>DebugUnTrace       :call LimpBridge_send_to_lisp("(untrace ".expand("<cword>").")")<CR>
nnoremap <silent> <buffer> <Plug>DebugInspectObject :call LimpBridge_inspect_expression()<CR>
nnoremap <silent> <buffer> <Plug>DebugInspectLast   :call LimpBridge_send_to_lisp("(inspect *)")<CR>
nnoremap <silent> <buffer> <Plug>DebugDisassemble   :call LimpBridge_send_to_lisp("(disassemble #'".expand("<cword>").")")<CR>
nnoremap <silent> <buffer> <Plug>DebugMacroExpand   :call LimpBridge_macroexpand_current_form( "macroexpand" )<CR>
nnoremap <silent> <buffer> <Plug>DebugMacroExpand1  :call LimpBridge_macroexpand_current_form( "macroexpand-1" )<CR>

nnoremap <silent> <buffer> <Plug>ProfileSet      :call LimpBridge_send_to_lisp("(sb-profile:profile ".expand("<cword>").")")<CR>
nnoremap <silent> <buffer> <Plug>ProfileUnSet    :call LimpBridge_send_to_lisp("(sb-profile:unprofile ".expand("<cword>").")")<CR>
nnoremap <silent> <buffer> <Plug>ProfileShow     :call LimpBridge_send_to_lisp("(sb-profile:profile)")<CR>
nnoremap <silent> <buffer> <Plug>ProfileUnSetAll :call LimpBridge_send_to_lisp("(sb-profile:unprofile)")<CR>
nnoremap <silent> <buffer> <Plug>ProfileReport   :call LimpBridge_send_to_lisp("(sb-profile:report)")<CR>
nnoremap <silent> <buffer> <Plug>ProfileReset    :call LimpBridge_send_to_lisp("(sb-profile:reset)")<CR>
And at the end of the file we add these two functions:
function! LimpBridge_inspect_expression()
  let whatwhat = input("Inspect: ")
  call LimpBridge_send_to_lisp( "(inspect " . whatwhat . ")" )
endfun

function! LimpBridge_macroexpand_current_form(command)
  " save position
  let pos = LimpBridge_get_pos()

  " find & yank current s-exp
  normal! [(
  let sexp = LimpBridge_yank( "%" )
  call LimpBridge_send_to_lisp( "(" . a:command . " '" . sexp . ")" )
  call LimpBridge_goto_pos( pos )
endfunction
As you can see we added a bunch of internal mappings which we will use to
send forms to the REPL, by using the function LimpBridge_send_to_lisp().
We also added two new functions, LimpBridge_inspect_expression() which
will prompt you for a form and inspect its result in the REPL. The other
function LimpBridge_macroexpand_current_form() will call macroexpand
or macroexpand-1 on the form under the cursor.
To actually use these new mappings we have to map them to some keys by
adding the following lines inside the file keys.vim:
nmap <buffer> <LocalLeader>eu      <Plug>EvalUndefine
nmap <buffer> <LocalLeader>ea      <Plug>EvalAddWord

nmap <buffer> <LocalLeader>dt      <Plug>DebugTrace
nmap <buffer> <LocalLeader>du      <Plug>DebugUnTrace
nmap <buffer> <LocalLeader>di      <Plug>DebugInspectObject
nmap <buffer> <LocalLeader>dI      <Plug>DebugInspectLast
nmap <buffer> <LocalLeader>dd      <Plug>DebugDisassemble
nmap <buffer> <LocalLeader>ma      <Plug>DebugMacroExpand
nmap <buffer> <LocalLeader>m1      <Plug>DebugMacroExpand1

nmap <buffer> <LocalLeader>pr      <Plug>ProfileSet
nmap <buffer> <LocalLeader>pu      <Plug>ProfileUnSet
nmap <buffer> <LocalLeader>pp      <Plug>ProfileShow
nmap <buffer> <LocalLeader>pa      <Plug>ProfileUnSetAll
nmap <buffer> <LocalLeader>ps      <Plug>ProfileReport
nmap <buffer> <LocalLeader>p-      <Plug>ProfileReset
Now, assuming that your “leader” key is the inverted slash you can type
\eu when the cursor is over a symbol to undefine it, by calling
fmakunbound on it. And it’s similar with the rest of the mappings we
just defined; you can consult the SBCL manual to learn how to use
the tracing functionally as well as the profiler.
One mapping that is not connected to REPL functionality is EvalAddWord
mapped to the keys \ea. I use this to add symbols to Vim’s lispwords
option. When you write your own macros, unless you add its name to
lispwords, Vim will indent all forms passed to it as if they were
arguments to a regular function.
As an example, suppose you wrote a macro:
(defmacro my-macro (foo &body body)
  ... body of the macro ...)
Vim will indent code that calls this macro like this:
(my-macro hello
          (+ 10 20))
But after adding the macro name to lispwords by positioning the cursor
over my-macro and hitting \ea, Vim will indent the code like this (hit
\ft to indent the top form):
(my-macro hello
  (+ 10 20))
9. Closing open parenthesis
I told you at the beginning of this article that having a shortcut to auto-close open unbalanced parenthesis was desirable. Let’s add such shortcut. I extracted the following from the slimv plugin, written by Tamas Kovacs.
Let’s add a new mapping inside the file sexp.vim, around line number 53:
nnoremap <silent> <buffer> <Plug>SexpCloseParenthesis :call SlimvCloseForm()<CR>
and in the same file, at the very bottom, we’ll add these two functions:
"-------------------------------------------------------------------
" Close open parenthesis
" Taken from the Slimv plugin by Tamas Kovacs. Released in the
" public domain by the original author.
"-------------------------------------------------------------------

" Count the opening and closing parens or brackets to determine if they match
function! s:GetParenCount( lines )
    let paren = 0
    let inside_string = 0
    let i = 0
    while i < len( a:lines )
        let inside_comment = 0
        let j = 0
        while j < len( a:lines[i] )
            if inside_string
                " We are inside a string, skip parens, wait for closing '"'
                if a:lines[i][j] == '"'
                    let inside_string = 0
                endif
            elseif inside_comment
                " We are inside a comment, skip parens, wait for end of line
            else
                " We are outside of strings and comments, now we shall count parens
                if a:lines[i][j] == '"'
                    let inside_string = 1
                endif
                if a:lines[i][j] == ';'
                    let inside_comment = 1
                endif
                if a:lines[i][j] == '(' || a:lines[i][j] == '['
                    let paren = paren + 1
                endif
                if a:lines[i][j] == ')' || a:lines[i][j] == ']'
                    let paren = paren - 1
                    if paren < 0
                        " Oops, too many closing parens in the middle
                        return paren
                    endif
                endif
            endif
            let j = j + 1
        endwhile
        let i = i + 1
    endwhile
    return paren
endfunction

" Close current top level form by adding the missing parens
function! SlimvCloseForm()
    let l2 = line( '.' )
    normal 99[(
    let l1 = line( '.' )
    let form = []
    let l = l1
    while l <= l2
        call add( form, getline( l ) )
        let l = l + 1
    endwhile
    let paren = s:GetParenCount( form )
    if paren > 0
        " Add missing parens
        let lastline = getline( l2 )
        while paren > 0
            let lastline = lastline . ')'
            let paren = paren - 1
        endwhile
        call setline( l2, lastline )
    endif
    normal %
endfunction
Now we only need to add a key mapping inside keys.vim right after where
we added the previous mappings
nmap <buffer> <LocalLeader>cp      <Plug>SexpCloseParenthesis
imap <buffer> <C-X>0               <C-O><LocalLeader>cp
Now you can type \cp to close open parenthesis, but notice that I also
added an imap to be able to type CTRL-X 0 while in insert mode as
well; that’s what I usually use.
10. That’s all
I hope this helps you make a better use of Limp. When I started learning Common Lisp I didn’t want to be distracted by trying to simultaneously learn Emacs and SLIME. I used Vim and Limp exclusively during my first project with Common Lisp, and I didn’t have any major problems.
For my second project - and already feeling comfortable with Common Lisp - I decided to use only Emacs and SLIME. And I have to say that yes, SLIME is a superior development environment for Common Lisp. It is not indispensable, you can develop software without it just fine, but it is indeed a useful tool.
However, the editing model of Emacs is too limiting, and I think that if I want to continue using it with SLIME, I’ll have to explore options like viper or vimpulse; it’s just too painful not to have the Vi editing model.
Addendum: My window environment
I use a window manager called Ion, which is designed to be used with the keyboard instead of the mouse. Another nice feature of Ion is that the windows never overlap (you could make them overlap though) and they are positioned in tiles that you define.
This means that I can, for example, position my code in the left half of my screen and a REPL on the right half, without any effort. I don’t have to struggle with resizing and moving windows so that I can see them both at the same time, as would be the case with a traditional window manager.
Here’s a screenshot of how my screen looks:
~
~
:wq